

Due to the new Coronavirus pandemic, Pee Wee was forced to temporarily shut its doors last week.
While we can’t be there for your little ones in person, we’d like to provide you with this list of fun and educational activities you can do with your preschool-aged children at home. Better yet, each of these projects can be done with materials you likely already have laying around the house.
If you don’t have the specific materials on hand or you’d to make them more or less challenging, we have included ways to tweak most activities. However, the possibilities are endless as there are countless ways to make each one of these projects your own.
We hope this list might help bring a little bit of Pee Wee magic into your home during these uncharted times.
1. Yogurt Painting

There aren’t many things young children love more than putting their whole bodies into art. If it’s nice outside (or if you don’t mind making a mess inside!) lay down a big piece of paper, an old sheet, a bunch of newspapers taped together, or anything else you have on hand that you can manipulate into a canvas. They can also simply use their hands or a paintbrush if you’re not feeling up to too much cleanup.
Use some food coloring to dye your yogurt in a large mixing bowl (you can also substitute shaving cream, whipped cream, or just plain non-toxic paint if you feel particularly ambitious). Use one, or multiple colors. Multiple will give you the opportunity to teach your child about mixing colors to create new ones.
Set your bowl on the ground next to your makeshift canvas and let your child create their own masterpiece. The great thing about using edible bases for paint it is safe for even the smallest children, even if they ingest it.
2. Recycled Art

Have an overflow of recycling in your garage? Repurpose any safe (no sharp edges, soda cans or glass for young children) recyclables into an art project for your child. There are numerous possibilities for this one.
For example…
- Painting:
- Jewelry:
- Sculptures:
- Musical instruments:
- Mosaics:
* You can also use this as an opportunity to teach your child about one-use products and how we can reduce waste by creating new uses for them.
3. Making Rainbows

This science experiment is fun for all ages. All you need is a sunny day (or a flashlight) and some basic household items.
The easiest way to do this is with a glass of water. Simply fill it up and put it in direct sunlight. You’ll instantly see a rainbow on the other side. The issue with this method is that it can be difficult to see the rainbow, especially if you’re in a very bright room. Try cutting a small rectangular hole in a piece of paper and taping it to the glass, letting the light hit that side. This concentrates the light into that slit you created, and creates a more vibrant rainbow.
You can also make a rainbow using an opaque dish filled halfway with water and a compact mirror. Place it so that the sun is hitting the mirror directly. Place a piece of white paper directly across from the mirror to “catch” the rainbow!
4. Ice Cube Fishing

Gather some ice cubes from the freezer and put them in a bucket (or bowl or cup) full of water. Get your “fishing pole” (yarn or some other kind of string) and dip it in the water, aiming it at an ice cube. Pour some salt over the cube and wait about 10 seconds. Reel in your fishing pole and see if you’ve caught the fish!
Plain water freezes at 32° F, but when you add salt to it, the water’s freezing point lowers. Since the ice cube can’t get lower than 32° F, it begins to melt. This creates a little puddle of water on top of the ice cube and the string sinks into it. But, when the salt dissolves into the water, the freezing point goes back up and that puddle re-freezes, trapping the string into the ice.
To spice up this activity, try diversifying your ice cubes with food coloring!
5. Homemade Bouncy Ball

To a child, the only thing better than a bouncy ball would have to be one that they’ve made themselves. Using a few everyday ingredients (and a lot of patience), you and your child can create one at home.
Ingredients:
- Borax
- Cornstarch
- Elmer’s Glue
- Warm Water
- Food coloring, paint, powder pigment, glitter, etc. (optional)
Instructions:
- Combine 1/2 tablespoon of Borax with 2 tablespoons of warm water and dissolve. Add your colors now if that’s the route your taking, otherwise the ball will be white.
- In a separate bowl/cup, mix 1 tablespoon of Elmer’s glue with 1/2 teaspoon of the Borax solution you just made. Add 1 tablespoon of cornstarch, but DON’T STIR.
- Let the ingredients sit for around 20 seconds.
- Stir until it gets too hard to continue, then move the mixture into your palms and start rolling it into a ball. Continue until it begins to feel solid.
- Let sit until its no longer sticky.
- Bounce!
6. Magnetic Play Jar
Have a glass jar or an old soda bottle laying around? Any clear container with a lid will do!
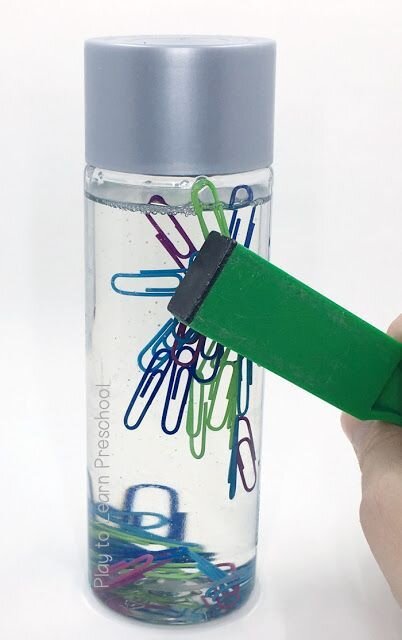
Just add a good amount of water, rice, pebbles, sand (or even dirt if you’re really desperate) to the container… until it’s about halfway full. Next, find something magnetic, like paperclips, bobby pins, pipe cleaners, etc. and add as much as you’d like. Seal the top and get a nice, strong magnet. Lay the container down so that there is space between the filler (rice) and the top of the container. Rub the magnet along the top and watch the the little magnetic pieces fly upwards!
Include a lesson on which materials are magnetic and which are not by adding some non-magnetic items to the container. Some examples are rubber bands, erasers, pieces of fabric or paper, etc.
7. Homemade Sensory Playdough

Making playdough at home is not only great in a pinch, but it’s also much more economic and there’s sure to be less stress about it drying out. It’s how we’ve been doing it here at the preschool for decades! We like to store ours in quart size Ziplocks. The dough typically stays soft for about 3 months.
Follow this simple recipe to make your own playdough. Add food coloring or glitter to it for some extra fun. When your finished, throw in some marbles, Legos, jacks, toy animals, blocks, cars, etc. for an added sensory experience.
Ingredients:
- 2 cups all-purpose flower
- 3/4 cup salt
- 4 teaspoons cream of tartar
- 2 cups lukewarm water
- 2 tablespoons vegetable oil (or coconut)
Instructions:
- Stir together the flour, salt and cream of tartar in a large bowl
- Add water and oil. Stir in any color/glitter now.
- Cook over medium-heat, stirring constantly. Continue doing so until the dough has thickened and begins to form a ball.
- Remove from heat and place inside a bowl or onto wax paper
- Allow to cool slightly, then knead until smooth
8. Muffin Tin Sorting

Sorting games are almost always available to the children here at Pee Wee. They are important for young children’s fine-motor skills as well as spatial thinking.
The good news is, sorting games are incredibly easy to create at home. Muffin tins work great for this. We often use tweezers here at school, but feel free to get creative finding other grabbing tools. Or, just let the children use their fingers.
There are endless ways to sort, but color tends to be the most friendly for all ages. You can use markers and little pieces of paper to label each space in your muffin tin.
Then, find small objects around the house for each color you’ve made a spot for. Put everything into one bowl (or spread it out on the floor or countertop to make things easier) and let your child get to work.
9. Water Dropper Transfers

All you need for this fine-motor strengthening activity are bowls, one eyedropper per child, and water. Food coloring is optional if you want to be able to mix colors (or just make things more fun).
Fill one bowl up with water and let your child transfer water to another with the eyedropper. If you’re using color, white or clear bowls work best. You can shake things up by using cups and bowls or several receptacles of all different sizes.
With any luck this list will add some structure to these long days of quarantine.
If you do try any of these activities at home, please show us by tagging Pee Wee Preschool in your Facebook posts.
We look forward to seeing all of your wonderful faces again soon. Stay healthy!